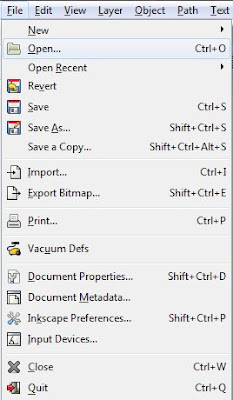
To copy off of a photo or picture in Inkscape go to file and click open.

 You do not want to draw on the root so go to the top tool bar and find layers. Click this.


You can also add on to a line by selecting it then clicking on the bezier tool so that line will have a box at the end of the line where you can click and add on to the line.

 Once you click the arrow a drop down will appear. Click the last stop. Drag the opacity level up to 255. Go back to the drop down menu and click the first stop. Drag the third bar up until your satisfied. Click the x to close that window. Go back to the left tool bar and click on the tool third from the bottom that looks like this.


Once opened your screen will look like this, I chose a drawing I drew a while back to copy. Then save it by going to file and clicking save as.

This is the root as labeled below
You do not want to draw on the root so go to the top tool bar and find layers. Click this.
You will see a box open up asking what you want to name the layer. Once you have named your layer click add. Make sure you are on that layer by simply looking at the bottom of the screen underneath the color bar and checking what layer it is on. You can click the arrow to see every layer that you have which is just one.
If you press the selection tool on the side tool bar you will notice that you can drag the root. To undo something press the control key and the z key. To redo something press the control key, shift, and z. Go back to your layer in which you are drawing on.
To start the line art press the bezier tool. Click and drag the angle you want.To end a line double click.
Make sure all lines are connected because when you start to fill in, the paint may leak into an area you don't want it or if the area is not bounded it won't paint at all.
If you are not happy with a line click the node tool on the side bar second from the top. You will see boxes wherever you clicked. Click on one of the boxes and two circles will appear, if you dragged the line. You can click on the circle and drag it this will change the line.

It is kind of hard to see it in this picture but the line is right along the edge of green where you can see the box and circles.
You can also add on to a line by selecting it then clicking on the bezier tool so that line will have a box at the end of the line where you can click and add on to the line.
Save along as you go so if something happens you don't lose everything.
Once you are done with the line art and everything is edited to your liking and connected you can start filling. At the bottom of the screen you will see a bar with colors. Select a color. To select a stroke, the color of the line, press shift. Start with the base color before you go on to the shading. If you have something shiny like a pearl necklace or bracelet. Go to the top tool bar and press the gradient editor or Shift+Ctrl+F
You will see bar on the side of your screen appear. It has a row of different fills at the top of it, click on the third one from the left.
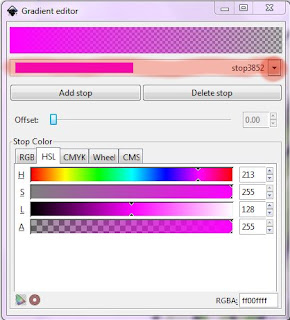
The color changes but don't worry. click edit and a box will appear. Click the arrow
 Once you click the arrow a drop down will appear. Click the last stop. Drag the opacity level up to 255. Go back to the drop down menu and click the first stop. Drag the third bar up until your satisfied. Click the x to close that window. Go back to the left tool bar and click on the tool third from the bottom that looks like this.
Then you can move the shine around where you want it to be using that tool.
Thanks for reading! Give me feedback in the comment section.
No comments:
Post a Comment